Entries in Easy Recipes (13)

Friday
Dec242010

Georgia & Susan's Charming Coconut Cake Recipe


Oh, ya'll. If I could, I'd send you all a piece of this heaven. It's my mom's coconut cake (you remember the mom and her red-velvet concoction? This is on the same level). The recipe originated with my great-grandmother Georgia, and since her passing, my mom has spent the past 20 some odd years figuring out just how Georgia did it. And Mom has nailed it, I tell ya.

I've placed it in my blog's "Easy Recipes" category, but this isn't the easiest in the bunch, to be honest. It involves fresh coconuts and their milk, and takes about two days from start to finish. Nevertheless, IT IS SO WORTH IT.

This year's cake was especially amazing--"shut-your-mouth good," as my sister-in-law would say. Print it out and keep it for a special occasion. You'll be so glad you did.

Fresh Coconut Cake

3 cups cake flour

2 cups sugar

5 eggs

8 oz butter

1/3 cup Crisco

1 cup evaporated milk

1 tsp vanilla

2 coconuts (shake to make sure they're full of milk)

Cream butter, sugar, and Crisco. Add eggs, one at a time. Add flour and milk alternately. Add vanilla. Make 4 layers. Bake at 325 degrees for 25 - 30 minutes.

Grate coconut and save milk. Make 7-Minute Icing.


7-Minute Icing

1 1/2 cup sugar

1 tsp lemon juice or 1/2 tsp cream of tartar

2 egg whites

4 tbsp cold water

1/2 tsp vanilla

Boil ingredients until a soft ball is formed. Pour over egg whites and beat. (Beat egg whites first.) Pour coconut milk over layers. Then spread icing and sprinkle coconut until layers and sides are covered.

Friday
Nov052010

What's your comfort food?

So this is what it looks like when I'm sick. (Or at least what my stove looks like.)

I'm at the tail end of what I think is a sinus infection, and you know how it is: everything's gross, everything's, um, drain-y. And for some reason, when I am like this, I crave only two things: peanut-butter-and-jelly sandwiches, and my favorite pasta-chickpea dish.

This pasta recipe was introduced to me by a lovely woman who worked with me at my first NYC job (a now-defunct magazine called Expedia Travels). I had just moved to the city, and although I had a job, I did not have a home. I searched for an apartment after work, and afterwards spent my nights sleeping on friends' couches and blow-up mattresses.

After a couple weeks of looking, my coworker Kathleen took pity on me and offered to let me crash for a weekend at her home on Long Island. She was amazing--completely generous, upbeat and adorable, and a clearly trusting of even the newest of friends. We had a great time in her modest home talking about boys, staying up late, drinking wine, and eating dinner in her comfy kitchen.

The first night I was there, she welcomed me with a good ole' salad and pasta supper. The pasta dish was made with chickpeas, olive oil, and garlic served over bow-tie pasta and topped with Parmesan. It's nothing fancy, but for some reason--I don't know if it was the generosity with which it was made, the relief of being new in town and having someone take care of me, or the extreme carbohydrate count--it struck a chord with me. I've been whipping it up for myself ever since.

And you know what's strange? I can make this dish in my sleep, but I've never made it for anyone but me (okay, save for one friend ONCE--and only because she was a vegetarian and I have no other veg dishes up my sleeve). In a way, I hog (literally, figuratively) this pasta love all for myself.

But here's some love for you: if you have a sinus infection/cold/flu situation sometime soon, throw this on the stove and thank me later. It's warm and filling and loaded with good, happy feelings. And also carbs. Wonderful, wonderful carbs.


Kathleen's Chickpea Pasta

1 1/2 teaspoons garlic, minced

1 can chickpeas

Extra-virgin olive oil

Whole-wheat penne or bow-tie pasta

Parmesan cheese, shredded

In a saucepan, brown the garlic lightly over medium heat. Add chickpeas, and mix for 1 minute. Add olive oil (enough to just cover the chickpeas). Bring to a boil, then reduce the heat. Slow boil for about 25 - 30 minutes, stirring occasionally.

Serve over pasta and top with Parmesan. Also great with broccoli spears and chopped asparagus (and even topped with walnuts).  Serves 3

And you? What's YOUR comfort food?

Friday
Sep102010

Fresh Food in the City


Say hello to Lauren! She's been nice enough to guest today, and I have to tell you: if Lauren tells you something about good food, you need to listen up. She's pretty much one of the best cooks around (last time I was at her place up up uptown, she made duck). (DUCK!) Show her some love, won't you?

Living in NYC, you have access to just about anything your little heart desires. And when it comes to food, you have your pick of cuisine, anytime, night or day. But when it comes to produce, sometimes you are stuck picking up your bananas from a fruit stand on the street, and you have NO idea where they came from. Sometimes it is hard to be particular about your produce in this city of sometimes-too-many options.

Entrance, CSA. For those of you who don't know what a CSA is, it stands for Community Supported Agriculture. And to quote the wonderful site JustFood.org: "When you become a member of a CSA, you’re purchasing a 'share' of vegetables from a regional farmer. Weekly or bi-weekly, from June until October or November, your farmer will deliver that share of produce to a convenient drop-off location in your neighborhood."

Although I don't live in Amy's awesome borough of Brooklyn, I do live in the awesome Manhattan neighborhood of Washington Heights. My best friend, Christy, lives about a block from me, and we split our weekly vegetable CSA share. Here is a Tuesday evening in the life of Lauren and Christy with a CSA:


Picking up our veggies:  Our drop-off location is in the beautiful Fort Tryon Park at the New Leaf Cafe (an awesome fresh food restaurant, by the way).  A short walk into this park on a Tuesday night after work is kind of a treat in itself.


But then we see the board for today and sneak a peak at the beautiful produce we have in store.


Look at our booty! (I mean our vegetable booty, of course.) Usually, we just split it between us; but tonight, we are cooking a meal together with some of our new fresh ingredients.

RECIPE
Pan-Grilled Tomato and Chicken Tacos


Step 1: Cut up the tomatoes (we decided to use three types: beefsteak, yellow juliet tomatoes, and a zebra tomato)--oh and a little wine always helps...


Step 2: Add a little olive oil in a cast iron skillet over medium heat, and then add chopped tomatoes, cook for about 10-12 minutes until reduced


Step 3: Cut up chicken into one-inch cubes, dice a yellow onion, 2 cloves garlic, a chili pepper, chives, and cilantro

Step 4: in a large skillet, add olive oil over medium high heat, then add onion and garlic and let simmer for 3 minutes

Step 5: Once onion has softened, add chicken and chili pepper and stir until chicken is cooked through.


Step 6: Add tomatoes, chives, and cilantro and stir for another minute then remove from heat


Step 7: Serve chicken mixture in a warm tortilla with cheese and sour cream


Step 8: ENJOY!


Visit JustFood.org to find your local CSA.
Tuesday
Sep072010

The Perfect New Puppy Present


This first guest post while I am on break comes from Kristin Appenbrink (kristinapp.tumblr.com), a RealSimple.com staffer and fellow Brooklynite. She’s spent her summer making homemade ice cream (cherry, salted caramel, mint chocolate chip, and peach, to name a few flavors), and can’t wait for the weather to cool down so she can go back to baking and wearing cozy sweaters. Thanks, neighbor! And is it wrong that this post is sort of making me hungry?


It would be fair to say that I’ve been a bit puppy-obsessed lately. Given the fact that I live in the city and don’t spend a ton of time at home (save for lazy weekends, of course), I don’t think it’s fair for me to have a dog of my own. That means I have to live vicariously through my friends who have pooches, and that I have to do everything in my power to resist dognapping the pups that always seem to be tied up outside the Whole Foods (one of the few places you can’t bring your dogs, apparently).

Recently, one of my co-workers brought home an adorable, fluffy, and just a bit feisty standard poodle puppy named Normandy. She is so deliciously cute, and I can’t wait to meet her. I figured that this would be the perfect opportunity to try my hand at making homemade dog biscuits—as a sort of welcome home Normandy gift.

I know what you’re probably thinking: “Who in their right mind makes their own puppy treats?” I always thought that too, but the best answer I can give is that all rational thought vanished at the sight of this pup. (Just see the below photo, I mean, really. Adorable.) I was expecting the process to be difficult, so I was pleasantly surprised when it was incredibly easy, albeit a bit time consuming.

Here’s the step-by-step of making homemade dog biscuits. Get the complete recipe from Martha Stewart.
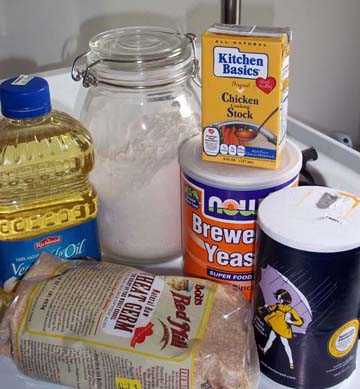


First, ingredients. There were a couple of things that I had to track down. I was able to find wheat germ pretty easily at Fairway, but they looked at me funny when I requested brewer’s yeast. I ended up having to go to GNC because, little did I know, brewer’s yeast is great for you. You can take it in pill form or sprinkle it on your food, but I can’t imagine that you would want to—it smells horrible.


Next, measure and dump all the dry ingredients in a bowl. Then alternate dry and wet while mixing in a separate bowl. I used my KitchenAid stand mixer instead of a hand mixer or whisk thinking it would save time. But unless you’re making a double batch, stick to the hand mixer. One recipe doesn’t fill up the mixer’s bowl enough, so you end up having to mix by hand anyway.


Once your dough is combined it’s time to roll it out on well-floured parchment paper. In my limited apartment kitchen, I do not have a rolling pin; but being a true RealSimple.com editor, I used an empty wine bottle, which works just as well.


Then for the fun part: cutting out the actual biscuits. I ordered the Fox Run Dog Bone Cookie Cutter Set from Amazon. I liked that it had three different sizes so you have options depending on the size of the dog.


Sadly, the fun part quickly turned into the tedious part, as I cut out the treats, re-rolled the dough, cut out more treats, and, slowly but surely, filled two baking sheets.

After being in the oven for 10 minutes, you take out the treats and brush them with chicken stock. It turns them a nice rich brown, and, I imagine, makes them quite irresistible to those of the canine persuasion. Once they are coated in chicken broth, they bake for another 10 minutes and then dry out while the oven cools, which takes about an hour and a half. (Just enough time to watch a couple of episodes of Pillars of the Earth on Netflix.)


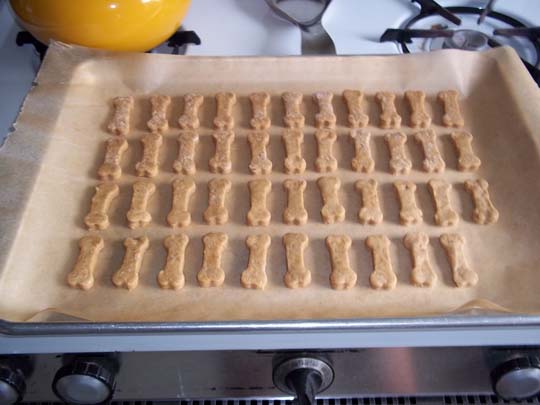
And here they are, the finished product. While I technically could have tasted one, they smelled a little bit too much like dog food to me. Thankfully, I heard back from my co-worker that Normandy loved them, so I’m counting them as a success.